آی پی امداد
abtahi
آریا الکترونیک تکشو

مدارات فلز ياب در اين تاپيک قرار مي گيرد

وضعیت
موضوع بسته شده است و نمی‌توان پاسخ جدیدی فرستاد.

mmlove2007

Banned
2008-03-09
176
442
اینم یه مدار دیگه

Barracuda_PRE21.jpg


attachment.php

attachment.php
 

safye

کاربر
2008-11-01
431
1,859
33
ساري
با اجازه اقا محسن...اين مدارو خودم درستش كردم تستش كردمو خيلي خوب و عالي جواب داد ...حلا بارتون مئزارم شمام تست كنين
این هم یک مدار ساده تر از مدار HAMMERHEAD که در صورت مونتاژ صحیح مدار بسیار خوبی است .

http://geotech.thunting.com/pages/metdet/projects/stuart1/stuart1_150.pdf

در ساخت وبهره برداری از این مدار بایستی نکات زیر رعایت شود : برای کسب بهترین نتیجه بایستی تمام خازنها تانتالیوم وپلی استر یا سرامیک انتخاب شود ودقیقا آن چیزی باشد که در نقشه ذکر شده است.مقاومت ها نیز باید با خطای کم یعنی ۵٪ باشند.البته اینها ضروری نیست ولی برای بهترین کیفیت و دقت بایستی رعایت شود.
ممکن است در این مدارکریستال ۴۰KHZ گیرتان نیاید که میتوان از کریستال ۳۲KHZ که در ساعت فروشی ها یافت میشودبا سری کردن یک مقاومت 33 اهمی استفاده کرد.این مقاومت برای کریستال 23 کیلو ضروریست.
نکته دیگر دیود 3 آمپری BY407A میباشد که بایستی حتما خودش یا مشابهش BYX55_600 باشد.در غیر این صورت قدرت مدار کم است.
سیم پیچ مدار بهتر است به صورت صفحه ای پیچیده شود مانندCD به طوری که دارای یک قطر داخلی و یک قطر خارجی باشد.چون این مد باعث می شود با قدرت بیشتری به زمین نفوذ کند .و در ضمن میدان مغناطیسی نیز هدر نمی رود.
و عبارتست از 27 دور سیم 0.71 دور دایره 20 سانتی مرتب وکنار هم.

در صورت بروزهر مشکلی در این مدار حتما با من تماس بگیرید
نتایج بدست آمده با لوپ 20 سانتی در عمق زمین:
سکه 250 ریالی =در عمق 25 سانتی .
سینی استیل با قطر 30 سانت= در عمق 155 سانتی.
جعبه آهنی به ابعاد 110*90*10 سانت =در عمق 230 سانتی .
 

safye

کاربر
2008-11-01
431
1,859
33
ساري
برای افزایش برد مدار فلزیاب بایستی کارهای زیر را انجام داد : 1-اگراین مداررابین قسمت vco وآی سی555 قراردهیم،میتواندولتاژی را که ازسیم پیچ دریافت میکند برای ما تا حد بیشتری حس کندوبردآنراافزایش دهد.ورودی مدار تقویت برد،به کلکتورترانزیستورTR5 وخروجی آن به پایه 7 آی سی 555 وصل میشود.

البته این مدار ممکن است باعث گلایه دوستان شودوبگویند چطورمداربه این سادگی میتواند برداین مدار را زیاد کند.درست است که مدار ساده است ولی در اصل یک تقویت کننده صوتی DC است که عملا این کاررا انجام میدهد.وشما میتوانید باافزودن یک ترانزیستور BC308 ومقاومت 1K ودیود 1N4148 دیگربه خروجی این تقویت کننده،برد را باز هم افزایش دهید.ولی بایستی از یک پتانسیومتر 10K در ورودی استفاده کنید.
*********************************************************
2-کاردیگری که بایدانجام داده شود نیز این است که سیم پیچ مدارراتغییردهیم.بایستی مانند سیم پیچ قبلی بپیچیم با این تفاوت که تعداد دور _ دهانه و قطر سیم فرق دارد و عبارتست از :
18 دورسیم لاکی 1mm دور استوانه ای به قطر داخلی 45 سانتی متر .
نتایج بدست آمده در عمق زمین با لوپ 45 سانتی :
یک سکه 250 ریالی=درعمق 40 سانتی .
ورقه فلزی به ابعاد 10*10 سانتی =در عمق 85 سانتی .
 

mmlove2007

Banned
2008-03-09
176
442
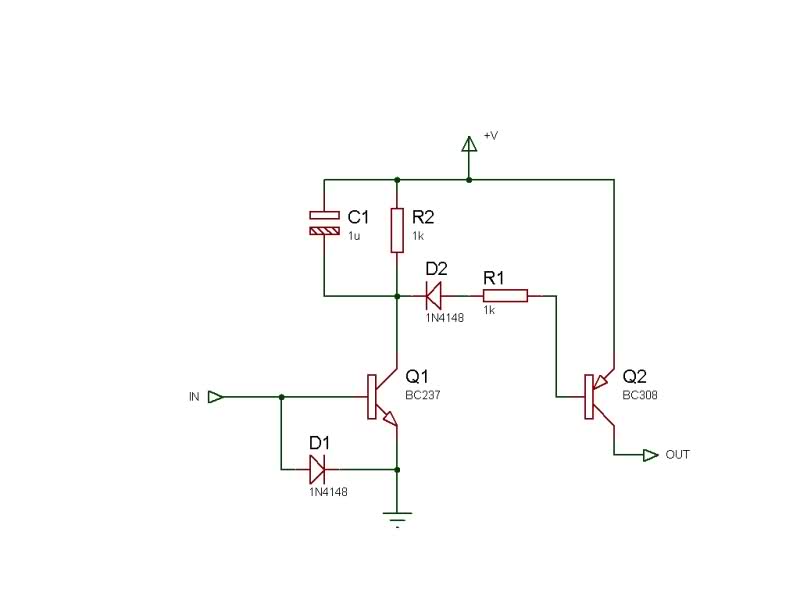
اينم چند مدار ساده براي دانشجويان جهت كار در ربات مين ياب

4.gif


Metal Detector MkII

updated 22-8-2006

This project is an extension of Metal Detector MkI, and shows how metal objects are detected. It is the second in a series of circuits and allows a great deal of experimentation, especially if you have a CRO (Cathode Ray Oscilloscope) and a few items to detect. You can view the waveforms and see exactly how they alter as an object is brought into the field of the coil.
67.gif

There are a number of ways to detect a metal object and alter the operation of a circuit so that an output is produced.
Metal detectors will detect ferrous (iron, steel, stainless steel) as well as non-ferrous (copper, tin, gold, lead, silver, aluminium) as well as alloys (brass, cupro-nickel, pewter etc).
Depending on the complexity of the circuit, a metal detector will be able to discriminate between a lump of gold and an aluminium ring-pull from a drink-can.
The circuit we have presented in this project is very simple and works on the principle of detecting the amplitude of a waveform. This is called AMPLITUDE MODULATION.
When a metal object is placed inside the detecting coil, some of the magnetic flux passes into the object and creates a current called an eddy-current. This "uses-up" some of the magnetic flux and thus less flux is available for the receiving coil.
This produces a lower output from the coil and causes the second transistor in the circuit to be turned OFF slightly and the voltage on the collector rises. This allows the third and fourth transistors to oscillate and pass a signal to the fifth transistor to drive a mini speaker.
As you can see, the circuit consists of a number of BUILDING BLOCKS. All you have to do is understand how each block works, and you will understand the whole circuit.
The concepts of TALKING ELECTRONICS is to explain how various building blocks operate so you can design your own projects. You can take any of the blocks and add them to your own project.
It will be necessary to connect them together correctly.

You can consider this circuit consists of three building blocks:

1. The first block is a FEEDBACK OSCILLATOR that gets its feedback via a transformer (the two coils act like a transformer). This uses the first two transistors.
The first transistor is turned on via the diode in the emitter of the second transistor. This diode receives its turn-on bias from the 1k8 resistor.
The resistance of the Rx (receiving coil) is very small and the base of the first transistor sees a "turn-on" voltage from the voltage across the diode.
The variable resistor in the emitter starts at a low value for our description of the circuit.
The first transistor has a high gain at this point in time and the Tx (transmitting coil) and 47n form a tuned circuit with a frequency of approx 15kHz.
The power rail is stabilized by the 5v6 zener and a small amount of noise is always present in any circuit and causes a small waveform to be produced by the inductor and capacitor.
This waveform is passed to the receiving coil (through the air) and a small voltage is produced by it.
Since the end of the receiving coil connected to the diode is fixed and rigid, the signal produced by the coil is passed to the base of both transistors. The coil is orientated so that the voltage it produces turns the first transistor ON harder and thus the waveform produced by the tuned circuit is increased.
Since the resistance of the pot is a minimum, the amplitude of the waveform will be a maximum and this will have the effect of turning ON the second transistor so that the voltage on the collector will be very low. The signal on the collector will be a waveform but this will be smoothed by the 100n capacitor.
As the resistance of the pot is increased, a voltage will appear at the emitter. Thus the base-to- emitter voltage will be LESS and the transistor will not be turned on as much. The waveform produced by the tuned circuit will reduce.
This will be reflected in the receiving coil and the second transistor will also get turned off slightly. The voltage on the collector will rise and this will be passed to the second building block . . .

2. THE VOLTAGE CONTROLLED OSCILLATOR
The voltage controlled oscillator is simply a direct-coupled high-gain amplifier with a 10n feedback capacitor to provide oscillation.
When a voltage appears on the base of the third transistor, it turns ON and this turns on the PNP transistor.
The voltage on the collector of the PNP transistor rises and this pulls one end of the 10n capacitor (via a 1k resistor) towards the positive rail.
The other end of the capacitor is connected to the base of the third transistor.
This turns ON the third transistor.
They keep turning ON until both are fully saturated (turned on). This happens very quickly and during this time the 10n capacitor starts to charge. The charging current flows through the base-emitter junction of the third transistor and as the capacitor charges, it develops a voltage across it. This causes the charging current to reduce. The third transistor gradually turns off and this turns the fourth transistor off slightly. The voltage on the collector of the fourth transistor drops and the voltage across the 10n capacitor causes the third transistor to turn off completely. This turns off the fourth transistor and now both are fully turned off.
The 10n discharges through the 56k and the cycle repeats.
As the voltage from the previous building block rises, the discharge-time for the capacitor is less and thus the frequency of the oscillator increases.
This is how the two-transistor direct-coupled amplifier turns into a variable-frequency oscillator.

3. THE DRIVER TRANSISTOR. The output of the oscillator is connected to a driver transistor via a 1k resistor. This resistor prevents high currents flowing when both transistors are turned on. The driver transistor is directly connected to an 8 ohm speaker. The 18R resistor reduces the volume and prevents large spikes appearing on the power rails. The result is a clicking sound.
For this type of circuit to be successful, the supply voltage must be maintained absolutely rigid for the detecting section. This is very difficult to do as the battery voltage changes as it gets older and all the semiconductor devices change according to the temperature. The supply voltage must be as stable as possible as the circuit is detecting a very small change in amplitude and the supply voltage has an effect on the size of the signal. The circuit uses a zener diode to create a fixed supply but as the temperature of the diode heats-up with current-flow, the circuit-settings change and a tone is gradually produced by the speaker. This has to be stopped by adjusting the pot on the emitter of the first transistor. This constant resetting of the circuit is called INSTABILITY and is one of the downfalls of the design.
However, for a simple circuit it offers very good sensitivity and an audio output.​
CONSTRUCTION

The diameter of the wire and the size of the coil is not critical however our prototype was 0.5mm enamelled wire wound on an 80mm diameter former.
The two coils must be placed beside each other and changing the number of turns of the receiving coil does not alter the sensitivity of the circuit.
The transmitting coil is 50 turns and the detecting coil is 70 turns.
The two coils must be placed together and covered with tape to keep them together.
Make sure the 50t coil is connected across the 47n capacitor as the circuit will not work if the coils are exchanged. Don't worry about the correct connection of the second coil as it can be reversed if the circuit does not work.
The circuit will detect a small button cell about 5cm above the coil


PARTS LIST
au$xx.50 plus $4.50 post
us
$xx.50 plus US$6.50 post
Order kit
1 - 18R all 0.25 watt
2 - 330R resistors
1 - 1k
1 - 1k8
2 - 10k
1 - 56k
1 - 220k
1 - 270k
1 - 1k mini pot
1 - 10n ceramic
1 - 47n ceramic
1 - 100n ceramic
1 - 1000u electrolytic
1 - 30metre 0.5mm enamelled winding wire

1 - 1N 4148 signal diode
1 - 5v6 zener diode
1 - 3mm red LED
3 - BC 547 transistors
1 - BC 557 transistor
1 - BC 338 transistor
1 - mini speaker
1 - 9v battery snap
1 - 9v battery
1 - 1m very fine solder

1 - Metal Detector MkII PCB
 

mmlove2007

Banned
2008-03-09
176
442
METAL
DETECTOR-1
A fun metal detector to find coins at the beach
All the parts for the PC board, PC board, battery and winding wire $10.00
including pack and post. You will also need an AM radio, base-board to
mount the parts and a wooden handle approx 1.5 metres long.


70.gif


71.gif

GOLD DETECTOR!
This project has not been called a GOLD! detector as this name has been left for the more complex detectors that actually discriminate been gold and other metals. There is an enormous difference between detecting gold and ordinary metals (called base metals). Apart from the fact that gold is over 1000 times more expensive, its magnetic differences are such that we can produce a metal detector that will discriminate between metals, both ferrous and non ferrous, and GOLD!
Gold detectors have come a long way in the past 15 years, especially during the rapid rise in gold prices, about 10 years ago.
At that time, "GOLD!" was on everyone's lips and as its price soared, GOLD FEVER took over and fossickers by the thousands took to the countryside to try their luck.

In areas where gold was found some 100 years ago in Australia, the country was dotted with prospectors combing the hills and flood-plains with gold detectors.
Encouraged by reports of sizeable nuggets being discovered, buyers flocked to purchase gold detectors. Prospecting shops sprung up everywhere and offered detectors not much more complex that this model with an amplifier (the equivalent to the AM radio), for $299! You may laugh, but when gold fever strikes, people do the craziest of things.

The chance of picking up a nugget of gold is a million to one. This is because the ground where they are found is quite often filled with iron and other minerals that will affect the reading of electronic detecting equipment and reduce their sensitivity. To overcome this we must employ very sophisticated circuitry so that only the "signature" of gold is registered on the equipment.

As you can imagine, detecting the difference between an aluminium ring-pull from a small nugget is an almost impossible task as ring-pulls are generally closer to the surface and swamp the minûte signature of any lumps of gold that may be buried deeper in the ground.

Also the background effect of the minerals in the soil has to be cancelled and when you do this, you lose some of the sensitivity of the detector. The answer is to tune the equipment for the terrain you are covering so that it is at peak performance. This requires a fair degree of skill and that's why more advanced detectors are available on the market.

To start you in this interesting field we have designed a very simple detector. It only requires a handful of components and an evening's work.
This way you will learn electronics while being able to go out and find something valuable.
It's not only gold that's worth finding but a whole range of items including money, jewellery, metal objects and things that have been lost for 100 years or more.

One of the best places to search is the beach. Lots of things are lost in the sand every year and it's very easy to scan the surface with a detector and dig them up.
Because this project is very simple we have not called it a gold detector as it cannot discriminate between any of the base metals and gold. Instead, the word "gold detector" can only be introduced with a more elaborate model where some form of discrimination is available.

We have called this design a "metal detector" as it lets you know when anything of a ferrous or non-ferrous nature is placed in the field of the coil.

HOW THE CIRCUIT WORKS
We will start the discussion when the conditions have settled down after a few cycles and the voltage on the base of the transistor is stable (fixed by the "holding" or "resisting" action of the 10n capacitor).

The circuit is an oscillator and the way it keeps oscillating is due to positive feedback. This is the case with all oscillators and the component that provides the feedback is the 1n capacitor between
the collector and emitter of the transistor. It may seem unusual that the transistor can be turned on via the emitter to keep it oscillating, but in fact it does not matter if the emitter or base receives a signal as the important factor is THE VOLTAGE DIFFERENCE between these two terminals.

If the base is kept fixed and the emitter voltage is reduced, the transistor sees a higher voltage between the base and emitter and it is turned ON harder. If the voltage on the emitter increases, the transistor turns OFF as the difference between the two is reduced.
This is exactly what happens in this circuit. The 1n capacitor between the collector and emitter influences the voltage on the emitter to turn the transistor on and off. It does this by constantly monitoring the voltage on the tuned circuit and passing the change to the emitter.

In this project, the TUNED CIRCUIT is the parallel components consisting of the inductor (the search coil) and the 1n capacitor across it. This is called an LC circuit in which the L is the inductance of the inductor in Henries (or mH or uH) and C is the capacitance of the capacitor in Farads (or uF or nF or pF).

We start when the transistor turns ON and allows a pulse of energy to enter the tuned circuit (later you will see how the transistor turns on).

The pulse of energy (current) starts by trying to entering both the coil and capacitor. You would think the coil has the smallest resistance but the capacitor is uncharged and presents a theoretical zero resistance and begins to charge. When a small voltage appears across it, you would think the coil would become the least resistance as it consists of only a few turns of copper wire.

But the wire is wound in a coil and forms an inductor (it has inductance). When a voltage is applied to it, the low resistance of the inductor allows a current to flow but this current produces magnetic flux that cuts the turns of the coil and produces a back-voltage that opposes the incoming current. It works like this: Suppose you supply 200mV to the coil. The back voltage it produces may be as high as 199mV and thus you only have 1mV with which to push current into the coil.
If the resistance of the coil is 100milli-ohms, the current will be about 10mA. The capacitor will accept more than this and so it gets charged first.

As the voltage on the capacitor increases, it presents its voltage to the inductor and allows a current to flow (at a rate which the coil will accept) to produce magnetic flux. This flux is called electromagnetic lines of force and creates an expanding field. The capacitor cannot provide energy for very long and after a short time the current reduces and this causes the magnetic field to begin to collapse.

The collapsing magnetic field produces a voltage that is opposite to that originally supplied to it and the bottom of the coil becomes positive with respect to the top.
If we think of the coil as being a tiny battery we see it adds its voltage to the 9v of the supply and the collector end of the coil becomes higher than 9v.

This voltage is detected by the 1n feedback capacitor (between the collector and emitter) and it passes the voltage to the emitter where it increases the emitter voltage. The base of the transistor is kept stable and fixed by the holding action of the 10n capacitor and the transistor turns off slightly. This action continues and eventually the collector can be considered to be removed from the circuit so that it puts no load on the tuned circuit. When an inductor is not loaded like this, the collapsing magnetic field will produce maximum voltage.

This is the case in the circuit above and as the magnetic field collapses, it produces a voltage (about 25v) that is considerably higher than that applied to it. This voltage is passed to the "C" component of the tuned circuit (the 1n capacitor connected across the coil) and the capacitor charges up.

When all the magnetic flux has been converted to voltage the capacitor is charged and it begins to deliver this charge back to the coil. In the process, the voltage across the capacitor is reduced and this voltage is detected by the 1n capacitor across the collector emitter terminals of the transistor. The result is the voltage on the emitter is reduced and the transistor is turned on slightly to deliver a pulse of energy to the tuned circuit.
This is when another pulse of energy is injected into the system and the cycle repeats.
The frequency of the circuit is about 140kHz and is set by the inductance of the coil and the capacitor across it.
When we place a piece of metal in the magnetic field of the coil, some of the lines of flux pass through the metal and are converted to an electric current called an EDDY CURRENT in the metal.

This means we lose some of the magnetic flux and so there is less available to return to the coil when it begins to collapse. This means the reverse-voltage produced by the coil will be lower and so the capacitor will take less time to charge to its maximum value. Thus the transistor will be turned on sooner and so the frequency of the circuit increases.

The flux produced by the coil is electromagnetic radiation identical to radio waves of the same frequency. If we place a radio near the coil and tune it to a harmonic, the two frequencies will "beat" together and produce a "quiet spot" on the radio.
When a piece of metal enters the field of the coil, the frequency changes slightly and a low-frequency tone is emitted from the speaker.
A shift in frequency of as little as a few hertz will be clearly heard and this is why the circuit is so effective.
The sensitivity of the coil depends on making the circuit change frequency at the slightest insertion of a metal object. This requires operating the transistor at an amplitude that is not overdriving it, so that the slightest injection of a piece of metal into the field will alter the frequency.

It is important to note that the AMPLITUDE of the waveform is also reduced when a piece of metal is introduced but the radio is not set up to detect this. Other metal detectors detect the drop in amplitude and later you will see how the two circuits compare.


<IMG height=25 alt=" Collapsing field produces a voltage into capacitor. 1n feedback capacitor sees this voltage " width=5 border=1 name=img1> <IMG height=25 alt=" capacitor charges up and turns ON transistor via feedback capacitor " width=5 border=1 name=img2> <IMG height=25 alt=" Transistor TOPS-UP capacitor and produces FULL magnetic field " width=5 border=1 name=img3> <IMG height=25 alt=" Capacitor is fully CHARGED. Transistor is turned off " width=5 border=1 name=img4> <IMG height=25 alt=" capacitor delivers charge to coil. Magnetic flux produced " width=5 border=1 name=img5> <IMG height=25 alt=" capacitor half discharged " width=5 border=1 name=img6> <IMG height=25 alt=" capacitor discharged " width=5 border=1 name=img7> <IMG height=25 alt=" magnetic flux collapses and produces a voltage in the opposite direction " width=5 border=1 name=img8> <IMG height=25 alt=" Capacitor half charged " width=5 border=1 name=img9> <IMG height=25 alt=" capacitor fully charged - but in wrong direction to turn on transistor " width=5 border=1 name=img10> <IMG height=25 alt=" capacitor delivers its charge to coil. Magnetic flux produced " width=5 border=1 name=img11> <IMG height=25 alt=" capacitor half discharged " width=5 border=1 name=img12> <IMG height=25 alt=" capacitor fully discharged - go to first frame " width=5 border=1 name=img13>
72.gif

1. Glide your "mouseover" the boxes above and study each frame. 2. Hold mouse on box for "description." 3.
Mouseover: <IMG height=10 width=15 border=1 name=img14 bgcolor="FFFF00"> for animation.

There are many ways to explain how the circuit works and all of them are technically correct.
Here's an animated way to describe the cycle. The transistor is only turned on when the voltage across the capacitor is negative on the bottom plate. This is when the voltage on the capacitor is added to the voltage of the supply and passed through the 1n capacitor across the transistor to reduce the voltage on the emitter. The transistor turns ON and delivers a short burst of energy to the TUNED CIRCUIT.
The 4n7 on the emitter charges slightly during this action and the voltage on the emitter rises to turn the transistor OFF.
The charge on the capacitor is passed to the coil and it produces expanding magnetic flux. The capacitor runs out of charge and the coil collapses. The collapsing magnetic flux produces a voltage in the opposite direction and this is passed to the capacitor.
During this part of the cycle the voltage on the capacitor is not of the correct polarity to turn the transistor on and it remains OFF.
This is the part of the cycle when very little load is placed on the tuned circuit and the voltage produced by the coil can be higher than the applied voltage. The capacitor then delivers its charge to the coil and the cycle repeats.

CONSTRUCTION
All the parts fit on a small PC board with two wires from the coil and two from the battery.

PARTS LIST
1 - 220R (red-red-brown-gold)
1 - 47k (yellow-purple-orange-gold)
2 - 1n greencaps (102)
1 - 4n7 greencap (472)
1 - 10n greencap (103)
1 - 47u electrolytic
1 - BC 547 transistor
1 - slide switch
1 - 9v battery snap
1 - 9v battery
6.5m winding wire (gauge not critical)

METAL DETECTOR-1 PC board
73.gif

The search coil is made by winding 16 turns around a circular object 12cm diameter. This can be a juice bottle or even a square object as the coil can be made circular afterwards. Use 4 pieces of sticky tape or electricians tape around the turns to keep them in place and glue the coil to the base board with silicon sealant.

The base-board has a wooden handle screwed to it at an angle of 60°. You will also need a small transistor radio taped to the handle near the base so that it can pick up the field from the coil and detect when the frequency of the oscillator changes. The diagram below shows the best layout.

74.gif


TRYING IT OUT
Connect the battery and turn the transistor radio on. Tune across the dial and you get a number of spots where the radio will produce a whistle as a result of its local oscillator beating with the output of the coil of the detector.

75.gif

We got the best result at about 1400kHz and this is where the tone could be adjusted to a very low frequency.
When the detector was swept over a 20¢ coin at about 10cm, the change in the tone could easily be detected.
The frequency of the oscillator of the metal detector will change slightly as the battery voltage falls and as the temperature of the circuit increases on a hot day.
This can be compensated by adjusting the frequency of the radio so that the tone is kept as low as possible.
You are now ready to go out and try your luck.

IF IT DOESN'T WORK
If you don't get a squeal from your radio after tuning the entire band, the fault will lie in the oscillator.
This could be due to the transistor not having sufficient gain to produce oscillation or some of the parts not soldered correctly.
Try switching the circuit on and off quickly to spark it into action. If this doesn't work, check the wiring and make sure there are no shorts between the tracks.

If you have taken too long to solder the transistor or used a very hot iron, it may be overheated and its gain will be reduced. This will prevent the oscillator starting up. Replace the transistor and take more care with soldering.

The winding wire for the search coil is insulated with enamel to prevent the turns shorting against each other. But if you damage this coating by scraping or kinking the wire you may get two turns where the copper is touching each other. This will create a shorted turn and prevent the oscillator working. You must prevent any damaged sections touching each other.

Do not wind tinned copper wire around the coil to hold the turns in place as this will create a shorted-turn and prevent the circuit from oscillating.
It's best not to have any metal items near the coil as they will reduce its effectiveness. This includes nails and screws in the base-board. Metal objects that are away from the centre of the field are ok as they will have no effect.

CONCLUSION
We have found the circuit to be extremely reliable and self-starting. If you are experiencing any difficulties, it's best to put another kit together kit as you may have damaged a capacitor or the transistor and these are extremely difficult to diagnose.

We haven't found any valuable items with our detector but I hope you do.
70.gif


fery

کاربر
2006-11-16
237
1,062
iran
fery11.blogfa.com
مدار دلتا پالس

سلام دوستان مدار دلتا پالس است که از دوستانم ساخته بود و اصلا از ان نتیجه خوبی نگرفته بود.

نمونه عکس.................
 

پیوست‌ها

آخرین ویرایش:

safye

کاربر
2008-11-01
431
1,859
33
ساري
يه مدارتقريبا حرفه اي

توجه داشته باشید که این مدل فلزیاب برای اولین بار است که

ارائه داده میشود .البته شرکت های بسیار بزرگ آلمانی از جمله PULSEDETECTOR یکی از
ارائه دهندگان این مدارها بود که الان این سایت مسدود شده است.

http://s4.tinypic.com/mmvtc5.jpghttp://s4.tinypic.com/mmvtc5.jpg
فایل شماتیک (پروتل DXP ) :
www.sendmefile.com/00649955


فايل هگزشو هر كي بتونه بنويسه ممنوم ميشم
 

H-Ashrafi

کاربر
2008-11-13
50
120
سلام به همه دوستان
این هم ادرس چند سایت روسی ارایه دهنده مدارهای فلزیاب PI وIB:
www.md4u.ru
www.fandy.front.ru
www.mikes.front.ru
www.md04.narod.ru
www.alteh.narod.ru
www.anker50.narod.ru
www.phazitron.narod.ru
www.sevzirfo.narod.ru
www.vash.ru.net
www.metdet.ru
البته کسانی که قصد ساختن یک مدار خوب را دارند باید توجه داشته باشند که اکثر این سایتها و سایتهای فارسی مانند سایت sinamadar فقط مدارهای باعمق کاوش کم را در اختیار دیگران قرار میدهند و مدارهای حرفه ای را برای فروش در نظر میگیرند.بنابراین بهتر است به جای کپی کردن مدارات وتوضیحات مربوط به آنها ازسایتهای دیگر مدارهایی را که خودمان ساخته ایم و تست شده اند به همراه اطلاعاتی نظیر عمق کاوش واقعی آنها در اختیار دیگر دوستان قرار دهیم.
 
وضعیت
موضوع بسته شده است و نمی‌توان پاسخ جدیدی فرستاد.
بالا